The Staff
The staff is the basis of written music. It is what the notes are presented on. It consists of 5 lines with four spaces between them. A simple, unadorned staff is shown below.
Clefs

This is the treble staff. The treble clef (the large fancy symbol to the far left) shows the musician that the staff is treble. Since it curls around the G line, it is also called a G clef. The treble staff begins with the first line as E. Each successive space and line is the next letter in the musical alphabet. The staff ends with the last line as an F. Many mnemonic devices exist to help a person remember which line and space is which. One of the most common phrases to remember the names of the lines is: Every Good Boy Does Fine. (Also popular is Elvis' Guitar Broke Down Friday). To remember the spaces, just remember that they spell FACE starting from the bottom.

This is the bass (pronounced 'base' ) staff. The bass clef, also known as the F clef because it locates the line known as F, is on the far left. The bass clef uses the same musical alphabet as treble, but the letters start in different places. Instead of an E, the bottom line is a G, and the letters proceed logically from there. Again, simple mnemonics can be used to remember the names of the notes. The lines on the bass cleft, from bottom to top are: G, B, D, F, A (Good Boys Don't Fight Anyone), and the spaces are A,C,E,G (All Cows Eat Grass).

This is a C clef. The C clef can move on the staff, and the center of the symbol is always over C. Depending on where it is, it is given different names. The note beside each clef is C. These clefs are used very infrequently.
The Grand Staff

When the bass and treble clef are combined and connected by a brace (left) and lines, they become the grand staff. This greatly increases the range of pitches that can be noted, and is often used in piano music, due to the piano's wide range.
Measures

The vertical lines on the staff mark the measures. Measures are used to divide and organize music. The time signature determines how many beats can be in a measure. The thick double bars mark the beginning and ends of a piece of music. Measures are sometimes marked with numbers to make navigating a piece easier. The first measure would be measure one, the second measure two and so on.
Notes
Different pitches are named by letters. The musical alphabet is, in ascending order by pitch, A, B, C, D, E, F and G. After G, the cycle repeats going back to A. Each line and space on the staff represents a different pitch. The lower on the staff, the lower the pitch of the note. Notes are represented by little ovals on the staff. Depending on the clef (discussed below), the position of each note on the staff corresponds to a letter name.Notes Written on the Staff

Notes are centered on the lines or in the spaces between the lines. Stems on notes above the middle line trail down from the left of the note. Stems on notes below the middle line stick up on the right of the note. Stems on notes on the line usually go down except when adjacent notes have flags that go up. Note stems are usually one octave (eight successive lines and spaces) long. When two melodies occupy the same staff, the stems for the notes in one melody are written up and the stems for notes in the other are written down.
Ledger Lines

Ledger lines extend above and below the staff, allowing for higher or lower notes to be shown than would otherwise fit on the staff. These lines follow the same musical alphabet pattern as the staff does. Think of them as just extra lines and spaces on the end of the staff.
The stems of notes on ledger lines extend either up or down towards the middle line.
Note Durations
All notes have length. However, the amount of beats they get depends on the time signature, so only relative note durations will be discussed here.
This graphic shows a heirarchy of note values.
At the top is a whole note (1). A half note is half the duration of a whole note, so a whole note is equal to two half notes (2). Likewise, half notes are worth two quarter notes (3). Quarter notes are worth two eighth notes (4), and eighth notes are worth two sixteenth notes (5).

Sixteenth notes (right) and eighth notes (left) may also look like this. Single sixteenth and eighth notes have flags, many sixteenth and eighth notes combine flags into connecting bars.

Sixteenth notes and eighth notes may also combine together. the combination looks like this picture to the left.
Dotted Notes
A dot beside a note increases its duration by half its original value. For example, half notes, in 4/4 time, are worth 2 beats. When a dot is placed next to the half note, the duration is increased by one (one being half of the original duration of two) and the resulting duration is three beats. The curved line in the picture above is a tie. Ties connect notes that are the same pitch together to create a sustained note.
Rests

Rests are simply places where the musician does not play. Rests have equivalent values to corresponding notes of duration. Thus, there is a whole rest, half rest, quarter rest, etc., just like normal notes. Rests are always located in the same vertical position.
Accidentals
Accidentals modify the pitch of a note by increasing or decreasing it by one half step. Accidentals stay in effect for all notes of the same pitch for the rest of the measure. Accidentals in the very beginning of the music are key signatures.
Flats (left side of the picture) lower the pitch of the note by one half step.
Sharps (right side of picture) raise the pitch of the note by one half step.

Naturals cancel out any previous sharps or flats. The pitch returns to normal.
Ties and Slurs

Ties and slurs connect two or more notes together. Ties connect notes of the same pitch, forming essentialy one longer note. Slurs smoothly connect notes of different pitch. This means to play the notes without breaks. The first set of notes above exhibit a tie. The second show a slur.
Articulation

Staccato - Means to play the note very short and detatched.

Accent - Means to hit the note harder and louder.

Marcato - Almost a combination of staccato and accent, provides a sharp sound.

Tenuto - Hold the note for its full value.
Sforzando - A sudden, strong accent.

Fermata - Hold the note longer, approximately twice its value, or until conducted to stop.
Dynamics
This symbol is pianissimo, it means play very softly.
This symbol is piano, it means play softly.
This symbol is mezzo piano, it means play moderately soft.
This symbol is mezzo forte, it means play moderately loud.
This symbol is forte, it means play loudly.
This symbol is fortissimo, it means play very loudly.
Also abbreviated Cresc. or written in as crescendo. This sign is the crescendo sign, it means gradually become louder.
Also abbreviated as Decresc. or written as decrescendo, dim., or diminuendo. This sign is decrescendo, it means gradually become softer.
Repeats

These are the begin and end repeat signs. When you reach the second, go back to the first and repeat the music. These are often accompanied by first, second and even third endings.
This is a directional marking. It means 'Del Signo'. When you see this in music, you must go to the sign (below). This marking may also be accompanied by 'al coda' or 'al fine'. These mean 'Go to the sign, from there go to the coda' and 'Go to the sign, from there go to the end' respectively. Essentially these are big repeat signs.
This is the sign. From here you play to the coda or the end or wherever the Del Signo directs you.

This is the coda sign. It marks when to go to the special ending, or coda. Usually you won't go to the coda until after a D.S. al coda.
Time Signatures
The time signatures (also called meter signatures) tell the musician how many beats per measure there are, and what kind of note gets the beat.The top number determines how many beats there are per measure. The bottom number tells what kind of note gets the beat. In this example, 4/4 time, there are 4 beats per measure, and the quarter note (bottom 4) gets the beat. In 3/4 time, the quarter note would still get the beat, but there would only be 3 beats in a measure. In 6/8 time, the eigth note gets the beat, and there are 6 beats to a measure.
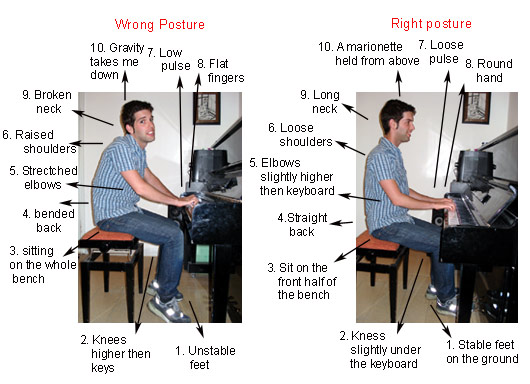
The pulse (or meter) is the driving beat in music that we march, feel, dance, clap and conduct to. First find the beat that seems the strongest, then try tapping along to it. Eventually you should be able to tap along with the music, and you will have found the pulse. Listen to the bass line and the rhythm section, as often they play with the pulse.
Inverting a chord simply means changing the order of the notes so that a note other than the root of the chord is in the bass.
It's important not to confuse root and bass. The root is the note on which the chord is built, while the bass is the bottom note of the chord—even if it is not the root.
For example, in a C major chord, C is the root, whether or not it is the bass note. As you probably know by this point in your piano studies, the notes of a C major triad are C, E and G, in that order.
Here is a C major triad with the root, C, in the bass:
 This chord is in root position.
If we move the C up so that the next note of the chord, E, is on the bottom:
 ... we get a C major triad in first inversion. Note that the notes of the chord are still C, E and G, so this chord must be a C major chord even if C isn't the bass note.
If we now invert the chord a second time, we'll have a C major chord in second inversion:
 Here, G is the bass note.
A chord has as many possible positions as it has notes. Since our triad above has three notes, there are three possible positions: root position, first inversion and second inversion.
Since root position is not itself an inversion, a triad has two possible inversions. We can extrapolate this rule thus: The number of possible inversions of a chord equals the number of notes minus one.
Inverting seventh chords
Let's now turn to four-note chords and take a look at a very common chord, the dominant seventh. Here is the dominant seventh chord in C major, in root position: Note that the dominant seventh is built on the fifth scale degree of
any key. The fifth note of the C major scale (i.e., the fifth scale
degree) is G.
Note that the dominant seventh is built on the fifth scale degree of
any key. The fifth note of the C major scale (i.e., the fifth scale
degree) is G.The notes of this chord, from bottom to top, are G, B, D, F.
Now let's take a look at the chord inversions. If B (the second note of the chord) is on the bottom, this chord is in first inversion:
 If the third note, D, is the bass note, our seventh chord is in second inversion:
 Finally, if the fourth note, F, is in the bass, the dominant seventh chord is in third inversion:
 Note that when determining the inversion, we're only concerned with the
bottom note—the remaining notes can be in any order. It's therefore the
bass note that determines the inversion.
Note that when determining the inversion, we're only concerned with the
bottom note—the remaining notes can be in any order. It's therefore the
bass note that determines the inversion.This concludes our second lesson on chord inversions. Practice hard and you'll soon be an expert!